If you follow me on IG you've seen my entry to Michaels Create2Educate sweepstakes. This photo prop came out EXACTLY the way I had imagined it! How often does that happen?
I decided to link up with Tara at 4th Grade Frolics to share how I made this photo prop. I'm so excited to be sharing because I have not shared anything I've made all summer! OOPS!
First, I went to Michaels and got some supplies. I decided to go with Caribbean blue and got matching glitter to add some pizzazz.
I removed the back because I don't need it. I used the backings to hold up the frame while I painted.
I find painting with acrylic to be more even and calming for me so I use it.
You can also paint with spray paint.
I add my extra fine glitter while the paint is still wet. Do you notice how I put a zig zag pattern? I find that I use less this way.
I rubbed the glitter in a circular motion to get it on the frame nice and even. I didn't want any nakey spots on my frame.
I am not blessed with a steady hands so I didn't bother trying to write on my frame. Instead I purchased wood letters. I didn't bother to draw our school mascot either. I bought a cute little dolphin too.
They were the wrong colors so I painted them with a few coats of acrylic paint in varying shades of blue.
Once everything was dry I used tacky glue to glue the dolphin and letters on. Hot glue will work as well.
I can't wait to take my students pictures with this prop. They really enjoy the honor of being "Dolphin of the Week" and I hope they feel extra special taking their photo with it.
I've seen so many 'READ' signs on Pinterest and Instagram I decided to hit up Hobby Lobby for some materials. I chose colors from my color scheme this year. I'll always use green and blue because they are my go to colors, they're easy to find in decor, and they're supposed to be calming. I just added yellow and red this year. I want pops of these colors, but not a whole lot because they seem to get my kidlets riled up.
I bought chipboard letters (each letter was .99 cents because they were half-off). acrylic paint (about a dollar each), mod podge (glossy), and brushes. I don't trust myself to make any cute designs with duct or washi tape. I just painted and mod podged-is that a word?-for the glossy sheen. I might add something to the letters, but I'm not sure what yet. Maybe one of you can give me ideas? That would be helpful. As is, I think they're pretty spiffy. I can't wait to add ribbon and hang them up in my library area. I'm going to use aqua ribbon since it's another color in my scheme.
Color names from l to r-
apple orchard, true blue, school bus yellow, and true red
Well, I finally mustered up the courage to upload to TPT. I figured anyone could use a free story map or two, right? I'll be using these in my classroom this week and I hope some of you will be too. I have other freebies to upload and I may do so very soon. Check it out and tell me what you think. Any advice or critiques are appreciated. I'd appreciate any positive feedback on TPT! Go ahead and follow me too. There's more to come!
I'm going to try something tonight. I want to kill two birds with one stone, so to speak. . .
Ok, I want to link up with both Blog Hoppin' and 4th grade Frolics. I don't know if that's against any bloggyland rules. Shhh. . . don't tell anyone!
I'll start with Blog Hoppin's linky party for Teacher Week 2013, Monday is Meet the Teacher Monday
I'm supposed to mention 10 FUN things about me.
I will try to think of only FUN things or at least weird. Weird is fun to me. . .
1. I memorize random facts after reading or hearing them once. Kind of like photographic memory, but not exactly. I know a lot of useless information. It makes me really good at Jeopardy, but not much else. . .
2. I'm uber competitive. It's a sickness. I can not stand to lose. So much so I will refuse to play any game if I think I'll lose. At the gym I pick a person and mentally compete with that person to get through a workout. Pathetic I know. . .
3. This is pretty random, but I wonder if anyone else does this. I have to smash my sandwiches, burgers, etc. before I eat them. Seriously, I didn't even notice this until my hubbs pointed it.
4. I buy EVERYTHING in multiples of 3s. I don't know if it's an OCD thing or if I just can't stand running out of an item. I always have back up and back up for my back up.
5. I have a West Texas accent because I was born and raised in the Lubbock area. People often assume I can't speak Spanish because of my accent. I like to surprise people by interchanging between the two.
6. I don't/can't play any musical instruments, but I love to sing. I sing ALL the time. I'm not saying I'm any good at it, but I sing all day long and I love singing with my own children and my students.
7. I can imitate a lot of voices. I have a wide vocal range. Sometimes I surprise myself. I do use this "talent" with my firsties and my own babies during read-alouds and they love it.
8. I'm the middle child of a pastor so saying I was a wild child is the understatement of the year! I made really good grades, signed up for all extracurricular activities and sports despite of all my crazy adventures so MOST of my teachers were o.k. with all this cray cray.
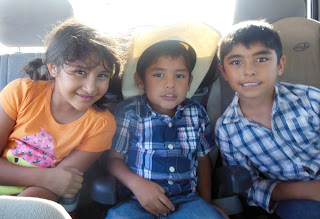
9. I have 3 kids. I guess that seems like a pretty common fact. What makes it fun is that when I was 20 I was told (by 3 dr.s) that because of medical issues I would be unable have children. I had my daughter at 22, my older son at 24. A few days before my 26th birthday I found out I was 6 months pregnant with my third child. God is GREAT!
3 Little Miracles
10. Everywhere I go kids and babies approach me like they know me. Kids come up and talk to me and babies reach out to me to be carried. It feels nice that little ones have that trust in me just by looking at me.
I'm not too sure if those were all FUN, but hopefully you get an idea of who I am. If you'd like to know some more randomness click here.
I have to say I joined teacher bloggy world to network with other teachers. Although I've only just begun blogging myself (long time blog stalker) I am having so much FUN because of all of you.
Thank you for sharing your creativity and time and thank you for letting me share too y'all!
Onto the second item of business. . .
I made several Monday made its, but I took them to school. Today was my first day working in my classroom. I'll take pics and add them here. Gotta love the update button :)
Anyhow, I do have one I want to share.
I changed my theme this year for something a little more bright and cheery.
I made some glitter clothespins last year for my display bulletin board, but a lot of my firsties took them home at the end of the year so I had to make more. I'm sure you've seen these all over Pinterest. If you're the original pinner on this project let me know and I'll credit you here.
This is an easy project because all you need is clothespins, glitter, and mod podge. This year I'll be using the clothespins to hold up photos on another bulletin board. Im going hot glue them to the ribbon and display the photos like a timeline. I'm sure you've seen the photo timeline on Pinterest too.
**HERE IS AN IDEA** I was stapling my photos onto my bulletin boards. Instead of messing up my photos with holes I am going to paste them onto a sheet of scrapbook paper and clip them onto the bulletin board by month. At the end of the school year I'll remove sheets August through June and make a scrapbook with all of our photos. (By the way I'm give my students a CD of all our photos at the end of the year as an EOY gift.)
I purchased these leaves at our local teacher store. I hot glued them onto the clothespins. Each student's name will go on the leaf (see how I used the veins to write?) and each leaf pin will hold their work to be displayed on the bulletin board outside my door.
(missing the thumbtack on back)
I really do envy all of you who get your student lists before school starts. We get a list the first day of school and it changes that first week so much. A lot of our parents like to wait the week of to register. (The only student names I know are teacher kids who placed them in my class.)
Remember this fabric?
and this blue one??
I made curtains to cover some shelves in my classroom.
I used an iron, the fabric, tension rods, and iron on hem tape. (Choose a tape that matches your fabric type. Some are thin and used on fragile fabrics like lace some are heavy duty for thicker fabrics like canvas.)
I ironed how I wanted my fabric to look hemmed. (I folded it and ironed it.) Then I placed the hem tape and ironed again. VOILA! The trickiest part is leaving enough space when making the "pocket" the rod slides through. I am the Queen of DIY Winging It. I used the actual rod to help me place the hem tape and ironed with the rod still there. LOL I love how the colors pop. They turned out to be a little long. Nothing a little hem tape won't fix tomorrow!
Here they are all wrinkled. Good grief!
**ANOTHER IDEA** I am going to use that Downy wrinkle away spray tomorrow to see if it works instead of ironing. I'm always up for finding ways for me to do less work. I'll update here tomorrow :)
I hope you enjoyed my two linky post. Can't wait to see what y'all have going on during this week's Teacher Week. Head back over here too!
I decided to link up to Tara @ 4th Grade Frolics for my first ever Monday Made it! On a Tuesday because on Monday I was at work. . .
Anyway, I piddled around all summer {and I'm not even sorry!} but, now it's time to get serious. This week is prep time because next Monday I get to set up and organize my classroom. Yes, I said I "get to" because I actually love doing that.
DISCLAIMER: This idea came from my mom who {GASP} doesn't have a Pinterest account. Any resemblance to anyone else's pin or ideas is purely coincidental. Thank you.
This is my first Monday Made it and I *LOVE* the way it turned out
Project #1-The foot stool
The stool had worn leather, but the cushion was still comfortable so my mom suggested I just cover it with fabric and put clear vinyl over it to protect the fabric.
Since I was going to cover the fabric I didn't bother getting a sturdy fabric. I wanted a low priced and solid colored fabric. I got the "medium" clear vinyl according to the lady who cut it for me.
I chose these two colors for 2 reasons 1) these colors pop and 2) no matter what theme I have I will always use green and blue. (The green looks dark in this photo, but it is actually lime.)
I borrowed my hubbs' screwdriver to remove the 4 screws that attached the cushion to the stool. (Shhhh. . .don't tell him. I am notorious for leaving his tools anywhere, but where I found them!) That part was easy enough.
I had no idea how to put the fabric or the vinyl on the cushion. So I fought with it for a LOOONG while, I FINALLY just folded the fabric and then the vinyl around the corners like I would with a flat sheet on a bed. . .then I stapled down like a mad woman!
I used my desk stapler to staple both fabric and vinyl to the cushion part of the stool. I know this is wrong and that there is a special stapler for this kind of work. I was just being resourceful and it actually held together pretty well.
Lastly, I put the screws back in and VOILA!
I like the way it turned out. This color will stand out in my classroom like a spotlight for my student of the week. This child will not have to sit criss cross on the carpet, but will get to use this special seat.
What do you think? Don't forget to link up. I should really put up the screwdriver . . .


.JPG)
.JPG)